cascoda-sdk
Development Environment Setup
To develop with the Cascoda SDK, the development environment must be set up. This is easier on Linux systems and macOS systems, but is also possible on Windows. The core components for development are fairly standard, and based on the GCC toolchain:
| Component | Description |
|---|---|
| gcc/g++ | Compiler for native builds |
| cmake | Build system tool for generating & managing build configurations |
| make | Build tool to execute the cmake-generated builds |
| arm-none-eabi-gcc | Compiler for Chili platform (and other embedded arm devices) |
| git | Version Control System for getting latest Cascoda SDK |
| gdb | Debugger for analysing executing programs |
| clang-tidy | Static analyser for detecting common code problems |
| clang-format | Code formatter for consistent code styling |
| doxygen | Code documentation tool for generating HTML docs describing code |
| plantuml | Diagram generation tool for generating UML diagrams in documentation |
Version Requirements:
- CMake must be version 3.13 or newer.
- clang-format must be version 6.0
It is possible to use alternative tools such as ninja instead of make, or clang instead of gcc, but that is out of scope of this document.
Linux
On a recent Debian/Ubuntu distro, you can set up the required development environment with:
sudo apt install git cmake cmake-curses-gui gcc g++ gcc-arm-none-eabi gdb-multiarch build-essential clang-format-6.0 make libhidapi-dev
#optional
sudo apt install clang-tidy-8 doxygen graphviz ninja-build default-jre
Also optionally download the plantuml jar
USB Exchange
In order to not require sudo to access Chili devices over USB, the permissions for cascoda devices should be loosened. This can be done by running the commands:
echo 'SUBSYSTEMS=="usb", ATTRS{idVendor}=="0416", ATTRS{idProduct}=="5020", ACTION=="add", MODE="0666"' | sudo tee /etc/udev/rules.d/99-cascoda.rules > /dev/null
sudo udevadm control --reload-rules && sudo udevadm trigger
UART Exchange
UART can be used for any posix serial ports. In order to use UART, the environment variable CASCODA_UART must be configured with a list of available UART ports that are connected to a supported Cascoda module. The environment variable should consist of a list of colon separated values, each containing a path to the UART device file and the baud rate to be used.
eg: CASCODA_UART=/dev/ttyS0,115200:/dev/ttyS1,9600:/dev/ttyS2,4000000
For example, on the Raspberry Pi 3 running Raspberry Pi OS, you can set up the UART as follows (this overrides the UART terminal):
# Prevent the UART being used as a Linux terminal, and enable it
sudo sed -i 's/console=serial0,115200 //g' /boot/cmdline.txt
echo "enable_uart=1" | sudo tee -a /boot/config.txt
# Reboot so changes take effect
sudo reboot
# Then add environment variable
# (warning, will not persist reboots unless you add to a startup script)
export CASCODA_UART=/dev/serial0,1000000
Warning: UART has not currently been implemented for windows.
macOS
Using Homebrew, you can set up the required development environment with:
brew tap ArmMbed/homebrew-formulae
brew install git cmake gcc g++ arm-none-eabi-gcc llvm@6 make hidapi
#optional
brew install doxygen graphviz ninja openjdk
Also optionally download the plantuml jar
Windows
Install:
- git (Add git to PATH when prompted)
- CMake
- mingw-w64
- arm-none-eabi-gcc
Note that if git was installed without adding to the PATH, then the build system will not be able to detect the version and will display ‘unknown’. Add the git cmd directory to PATH using the same method as below to solve this.
Make sure the mingw bin directory and the arm-none-eabi-gcc bin directory are added to your PATH environment variable. To add to path, take note of the installation directory during the install process. Then after installation:
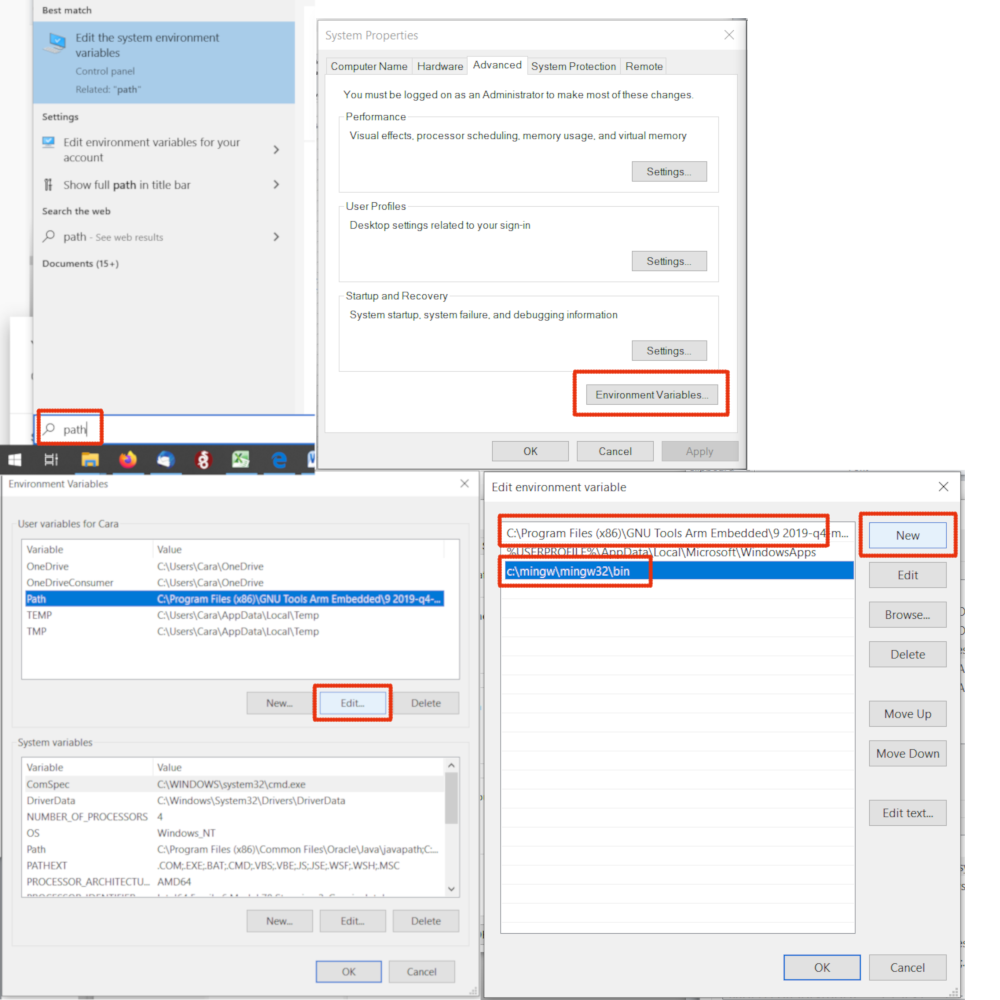
- Open the start menu and search for ‘path’
- Click on ‘Edit the system environment variables’
- In the window that opens up, click the ‘Environment Variables’ button.
- Select the ‘Path’ variable in either the ‘User variables’ (for current user) or ‘System variables’ (for all users)
- Click the corresponding ‘Edit’ button
- Use the ‘New’ button to add the mingw and arm-none-eabi-gcc
bindirectories. - Click ‘OK’ and exit
Optionally install: