cascoda-sdk
Thread Commissioning Guide
This is a practical guide for adding new Thread Devices to a Thread Network for the first time. It includes an overview of the commissioning process - more detail can be found in the Thread Group Commissioning White Paper and the Thread Specification.
What is Commissioning
In a Thread network, all communication is secured by a network-wide key. Without that key, a device cannot participate in the network. The network also has other parameters that must be consistent and can be configured, such as the extended PAN ID, admin password, channel and network name.
In Thread, the Commissioner is the user-controlled admin interface to the Thread network. The primary purpose of the Commissioner is to add new devices to the network by securely provisioning them with the network credentials. It can also be used to modify the network parameters safely after the network is formed. Multiple commissioners can control a Thread Network, but only one can be active at a time.
A Commissioner can take many forms, such as:
- An application on a smartphone connected to the same WiFi network
- A web GUI hosted on a Border Router
- A UI on a Thread Device itself
- A cloud service
But the general principles are the same. On a high level, the process is:
- The Commissioner forms a secure connection to the Thread Network (Using the Admin Password if not already on the Thread Network)
- The Commissioner is provided the credentials for the new device (The EUI64 address, and Joiner Credential)
- For a product, this is usually by scanning a QR code on the device, but details can also be entered manually
- The EUI64 address is propagated through the network
- This allows joining devices to search for the network that is expecting them
- The Joiner Credential is held by the Commissioner, and is used to establish a secure commissioning session with the joiner
- The joining device “discovers” the nearby network, and attempts to join the network(s) which are expecting it.
- The Commissioner authenticates the joiner using the Joining Device Credential and, if successful, the joiner is provided with the Thread Network Credentials.
The network credentials are stored in non-volatile storage of the device, so Commissioning is only necessary the very first time a device joins the network. If power is lost, the device is reset or otherwise loses connection temporarily, the Thread device can simply rejoin the network with the automatic ‘attach’ process.
How to Commission with the Cascoda SDK
In the Cascoda-SDK, there are many ways to perform the joining/commissioning procedure, based on the capabilities of the device. These can be used together in any combination - select one commissioning method and one joining method. It should be noted that a network must be formed either via the OpenThread CLI or the OpenThread Web GUI, before commissioning can take place.
Commissioning
CLI Commissioning
CLI Commissioning uses the OpenThread CLI of a device already on the network in order to commission another device. It is useful for development purposes and testing.
- The Commissioner device must be already connected to the desired network.
- The
statecommand can be used to test this - output should bechild,routerorleader.
- The
- Run the
commissioner startcommand.- The device will attempt to become the active commissioner
- Run the
commissioner joiner add <eui64> <cred>command- This adds the joiner as an authorised joining device
- At this point, turn on the new device (or start the joining process using the CLI).
- Wait for the process to complete…
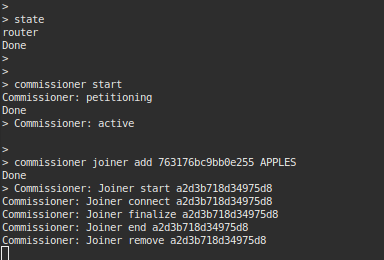
- Device has been commissioned onto the network!
App Commissioning
The App Commissioning process uses the official Thread Commissioning app in order to provide the most user-friendly method of commissioning. The source code of the Thread Commissioning app is available to members of the Thread Group, so it is possible to develop custom versions.
- Download the Thread Commissioning App from the Google Play Store.
- Connect to the same network as a Thread Border Router using WiFi.
- (Some Border Routers offer their own WiFi APs which can be used, however the Cascoda demonstration BR does not by default. Connecting the Cascoda BR to your home router by Ethernet will allow commissioning over WiFi, however.)
- Open the Thread Commissioning App and wait a few seconds for Border Routers on the network to be discovered.
- Select a Border Router with the correct network name (CascodaDemo in our case), and select it.
- Enter the admin password when prompted (123456 is the default for ot-br, we used ‘netpass’ - for a real network use a secure password!)
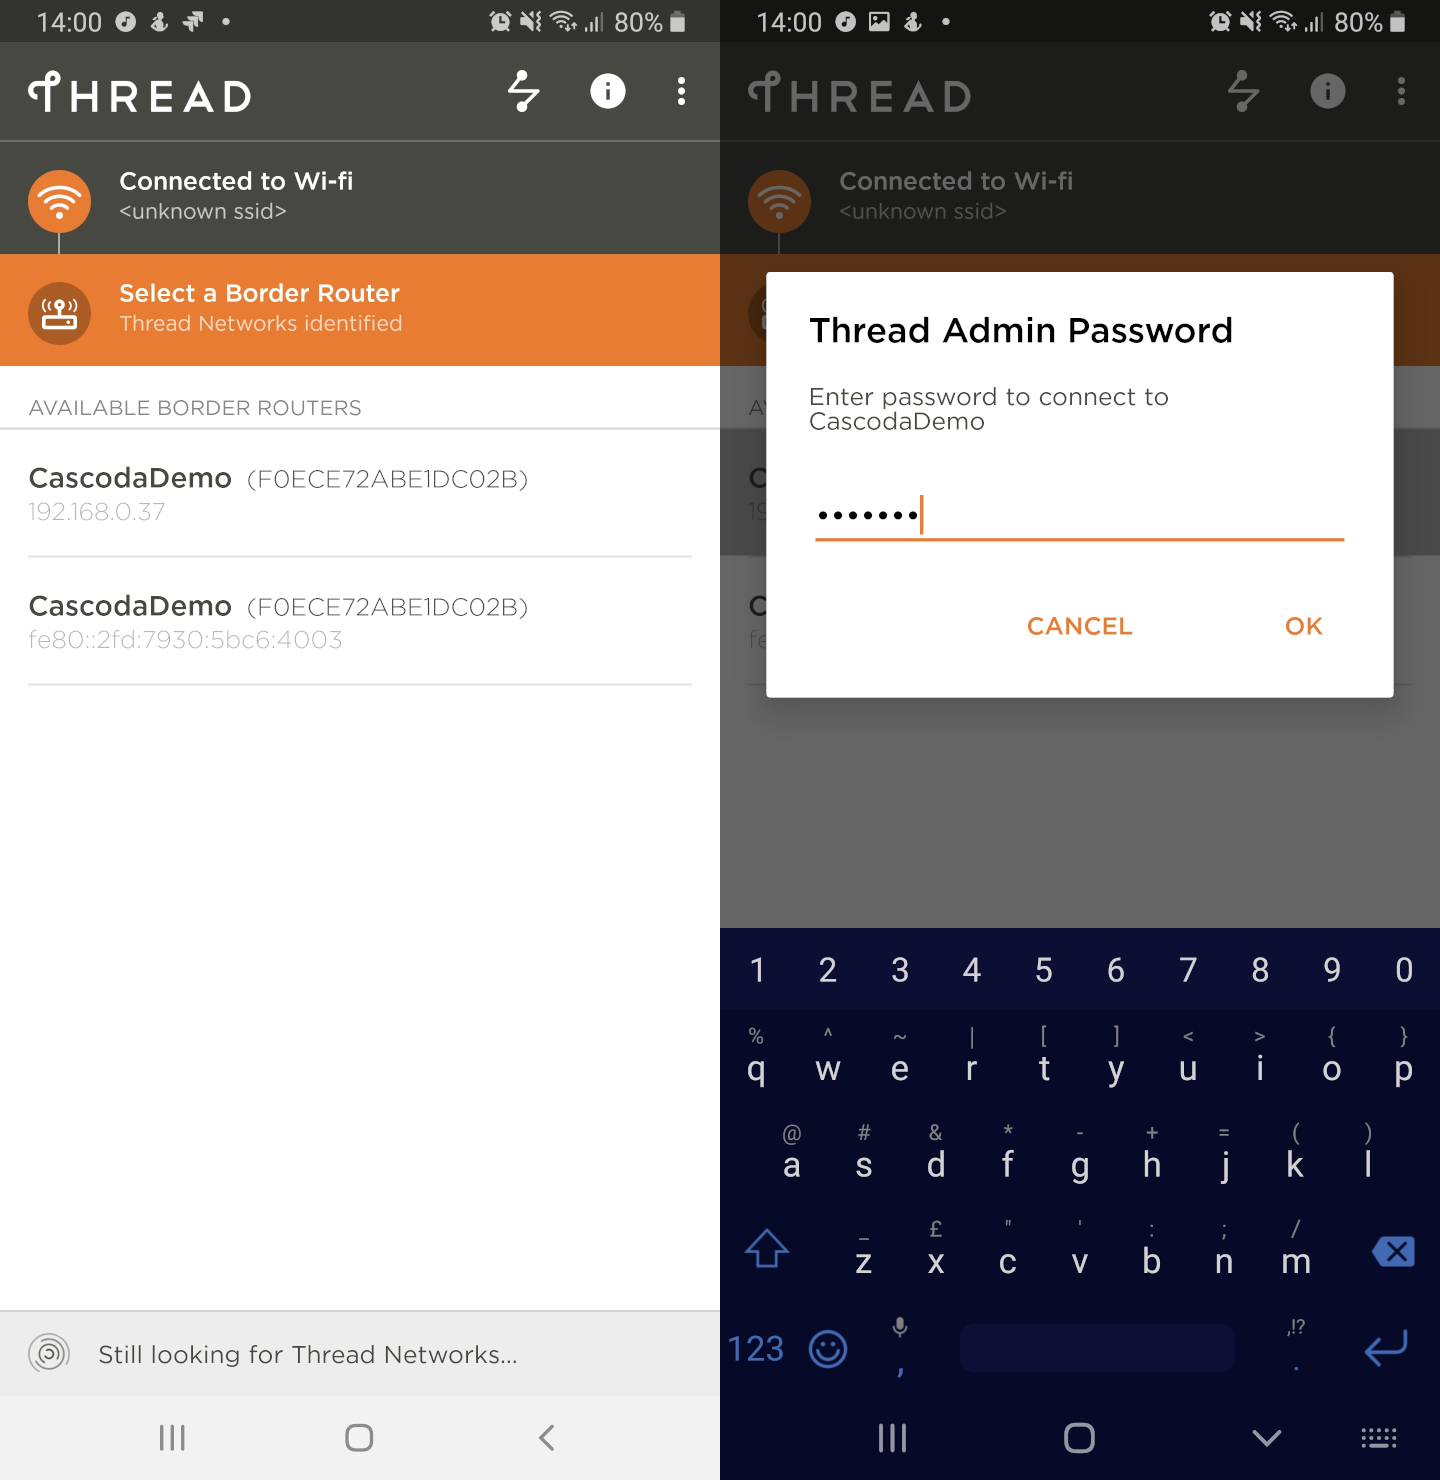
- The Thread Commissioning application will present you with a camera window to scan a QR Code.
- The QR Code is a simple text string in the format
v=1&&eui=0000b57fffe15d68&&cc=J01NU5 - Any text QR Code generator can be used (including online QR generators)
- The QR Code is a simple text string in the format
- OR The credentials can be entered manually using the ENTER JOIN PASSPHRASE MANUALLY button.
- Make sure that the credentials are correct!
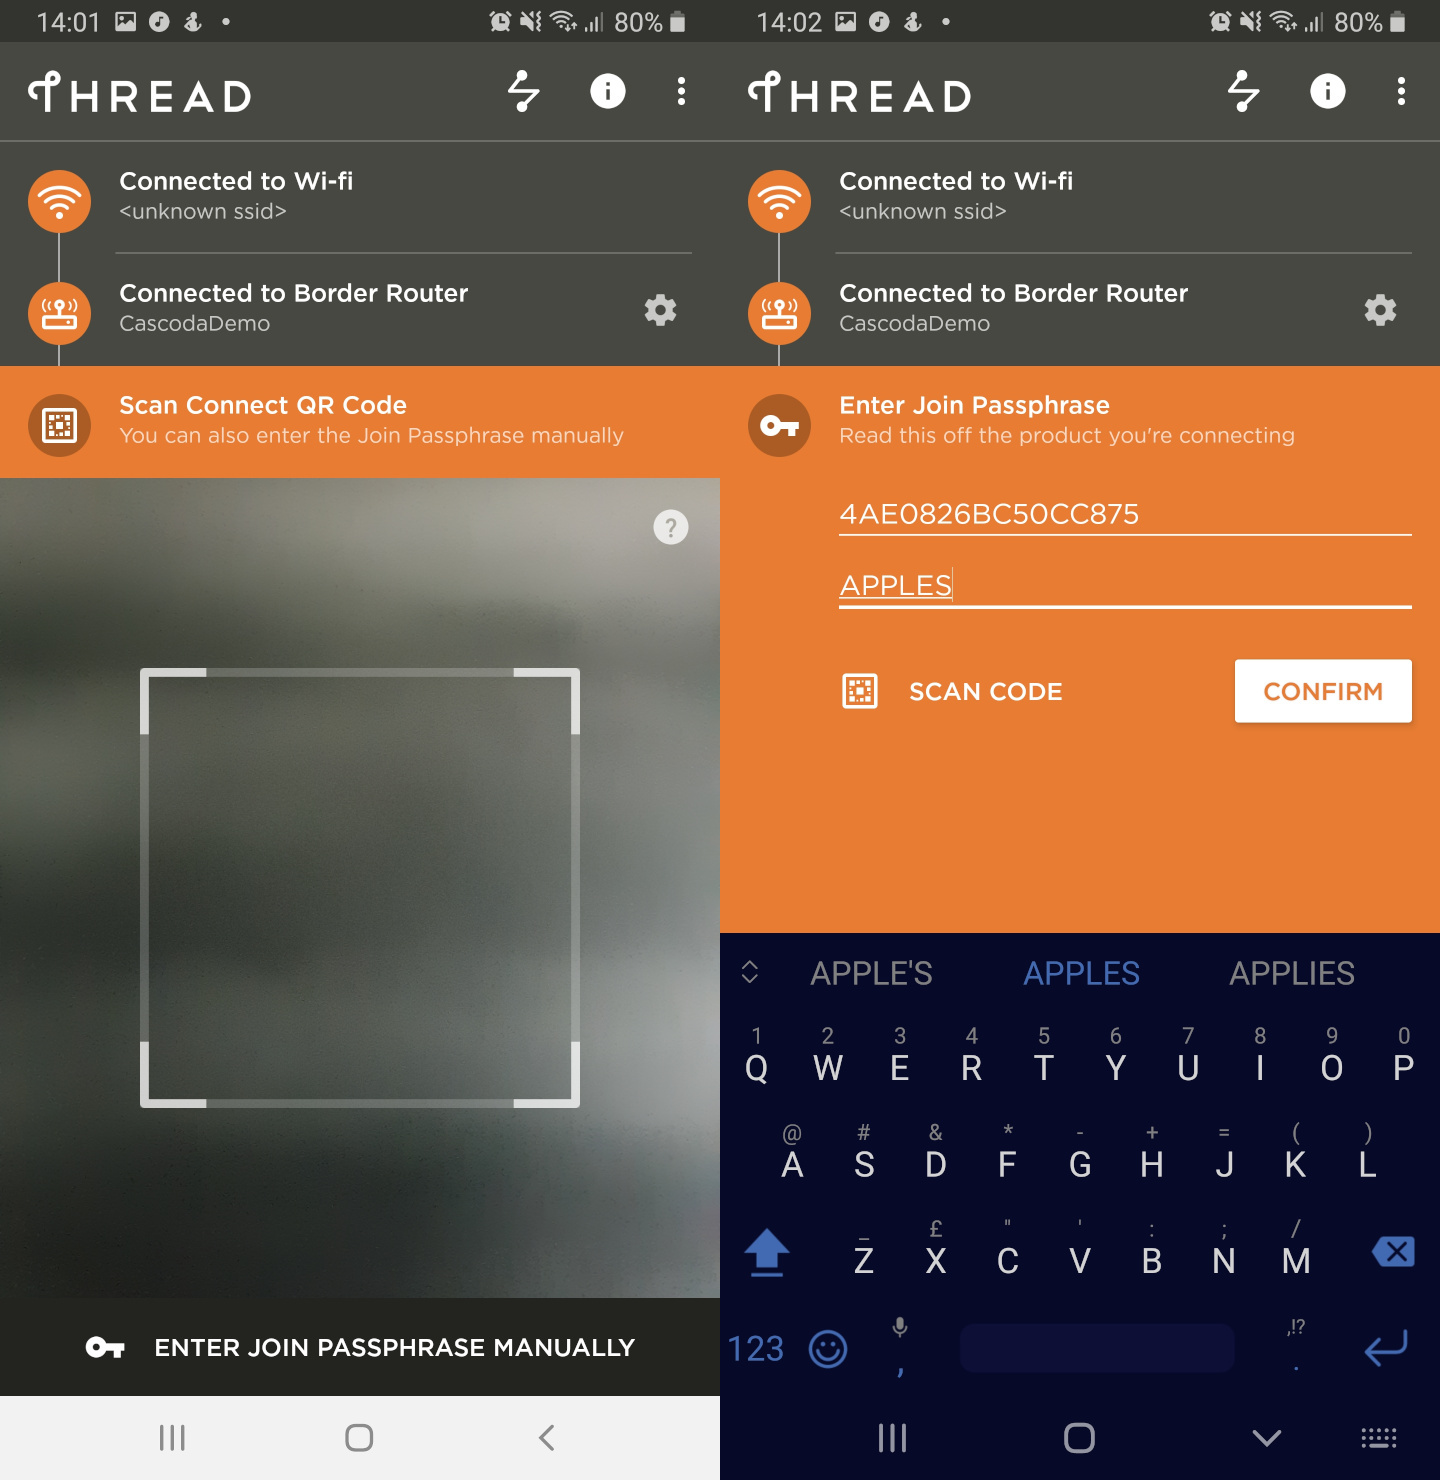
- Press ‘Confirm’, and the commissioning process should begin.
- At this point, turn on the new device (or start the joining process using the CLI).
- Wait for the process to complete…
- Device has been commissioned onto the network!
OT-BR Web GUI Commissioning
The OT-BR Commissioning process uses the Openthread Border Router web portal to add a new device to the network. It provides an example for how a production border router might allow a customer to add devices to the Thread Network.
Note: At the time of writing, the ot-br web gui is purely a demo/prototype tool and is somewhat unstable & incomplete.
- Open the ot-br GUI hosted at the local IP address of the border router.
- Navigate to the ‘Commission’ tab
- Enter the Network Passphrase/Admin Password and the Joiner Credential
- Note that the EUI64 is not required for this commissioning method. This is less reliable as the joining device will not be directed to the correct network.
- Click START COMMISSION , and the commissioning process should begin.
- At this point, turn on the new device (or start the joining process using the CLI).
- Wait for the process to complete…
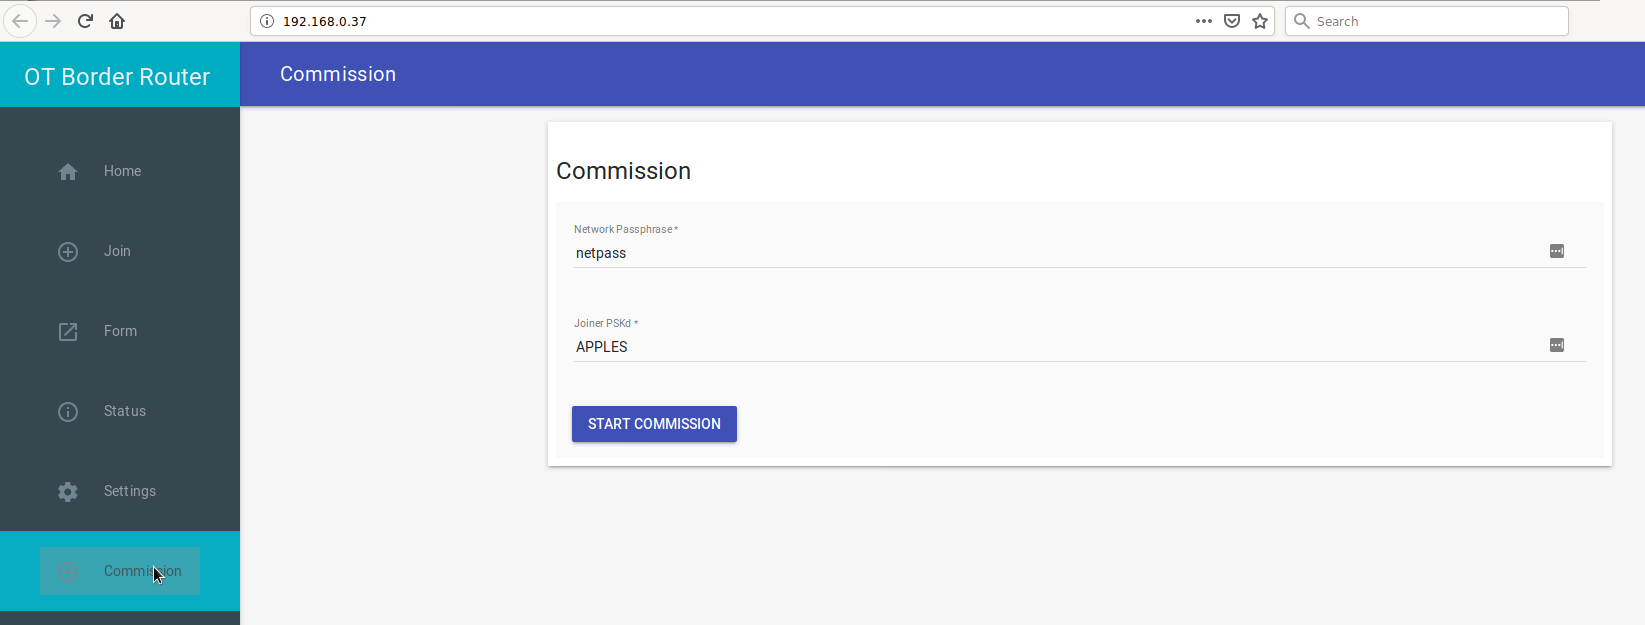
- Device has been commissioned onto the network!
Joining
CLI Joining
CLI Joining uses the OpenThread CLI in order to join a device to the network. It is useful for development purposes and testing.
- The Joiner device should not be connected to a network - use
factoryresetcommand to wipe all persistent storage and forget network info. - Run the
ifconfig upcommand.- This brings up the network interface and initialises the CA-8211
- Use the
eui64command to obtain the device eui64. - At this point, start the commissioner using one of the above methods.
- The joiner credential can be whatever you like for CLI joining (6-32 characters), as it is manually specified in the next stage
- Start the joiner using the
joiner start <cred>command- This command takes some time to run, and returns
Join successon success, orJoin failedupon an error.
- This command takes some time to run, and returns
- Run the
thread startcommand after join success to join the Thread Network!- The
statecommand can be used to check that the device correctly joined the network as achildorrouter.
- The
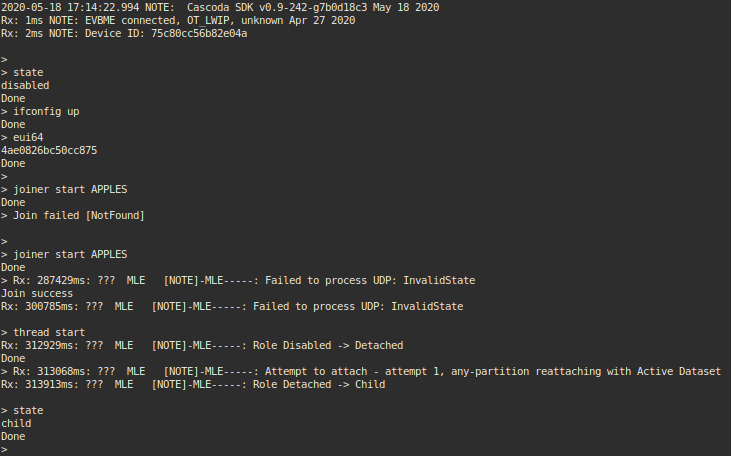
- Device has joined the network!
Automatic Joining
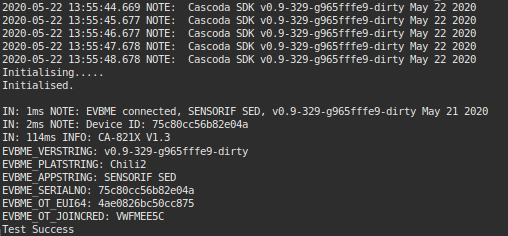
Automatic Joining is used with some of the demos in the Cascoda SDK that do not have CLI interfaces, such as ot-sed-sensorif. This kind of joining is suitable for real-world products, and sleepy devices that do not have a user interface.
In the case of our examples, we make use of the evbme-get utility to extract the credentials of the device. For real products, a label or other associated material would be more appropriate.
- Run the
evbme-getutility.- This can be obtained by either:
- Building the cascoda-sdk natively.
- Downloading Windows binaries from Github.
- This can be obtained by either:
- Connect the Chili device to the system.
- This must be done after running the utility, otherwise the device will go back to sleep.
evbme-getwill print system information for the connected device- Note the
EVBME_OT_EUI64andEVBME_OT_JOINCREDparameters
- Note the
- At this point, start the commissioner using one of the above methods and the parameters for the device.
- The Chili can be power cycled now to speed up the joining process.
- The Chili will attempt to join a network if it is not currently part of a network and either:
- It has just been powered on.
- OR It has been 30 seconds since the last join attempt.
- The Chili will attempt to join a network if it is not currently part of a network and either:
- Wait until the commissioner confirms the device has been commissioned.
- The device will automatically attach to the network and begin operation!
Automatic Joining with Hardcoded Credentials
Using CASCODA_OT_JOINER_CRED it is possible to assign a hardcoded joiner credential to a device, eliminating the need to force full network credentials to devices that don’t have serial interfaces, which is useful for development purposes.
- Provide a joiner credential value to the CMake cache variable
CASCODA_OT_JOINER_CRED. Further details can be found in CMake’s documentation. - For modules that do not support a serial interface power cycling the device will cause it to attempt to join with the hardcoded credential.
- For modules that do support a serial interface, such as
ot-cli:- Run the
ifconfig upcommand. - Then run the
joincommand- Similar to above, it should take some time to run, and returns
Join successon success, orJoin failedupon an error.
- Similar to above, it should take some time to run, and returns
- Run the